Active Directory Lab with Splunk
Introduction
This is the first stage of a multi-part lab series surrounding Active Directory. With its wide-spread use, Active Directory is the most commonly used User Management system for companies around the world. Knowledge of how it works, how to break it, and how to make it hum is critical for someone who wants to be in the information technology community.
The first part of this series will focus on setting up an Active Directory lab. I will go through the setup of virtual machines, Windows Server, Ubuntu Server, Windows 10, Active Directory Domain Services, and many more tools. While this is all good experience, we won’t be stopping there. We will dive into Splunk and its monitoring and logging capabilities. To see how Splunk works, we will conduct an attack against our Domain Controller, creating a perfect scenario to analyze later. This will provide us with critical skills in building an Active Directory environment, penetration testing, and monitoring for malicious activity.
Creating our Network Diagram
The first step is to create a network diagram to outline our deployment. This is crucial to organize the structure of our environment and define it at the networking level. You can create this in any program you want. I use excalidraw.com because its free and very easy to use. Below is the structure I built; this is what we will follow for this lab. Feel free to modify or change your lab however you wish. Exploring new territory on your own is great for building research and development skills.
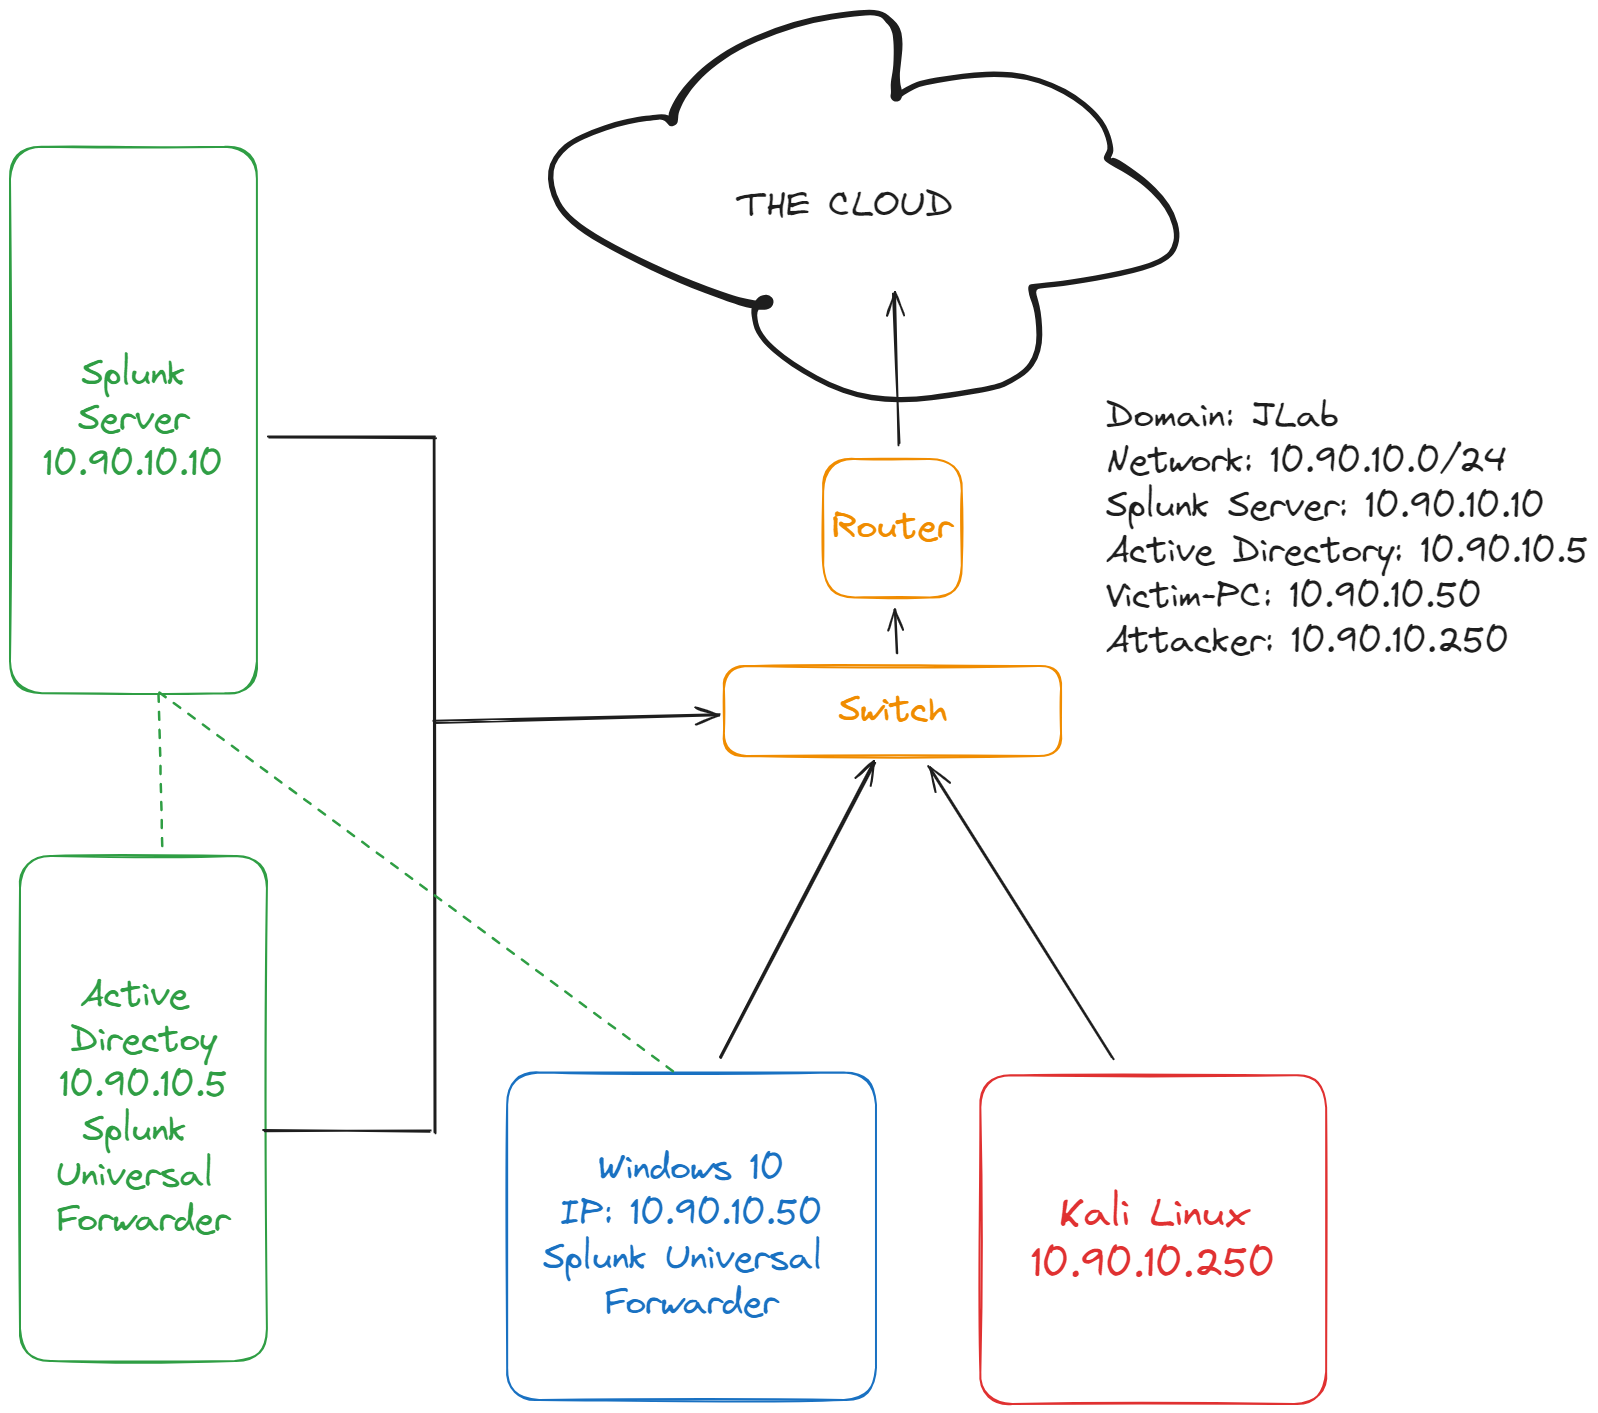 Network Diagram
VM Setup
Windows 10 PC
This will be our user in the Active Directory environment. We will be collecting logs and data from it to analyze via Splunk. Installing the Windows 10 PC is very straight forward. Download the ISO from Microsoft here and create a new virtual machine in Virtualbox. Select a name for the machine and find the ISO image. Check the box to “Skip Unattended Installation” so it lets us do all the setup. Set the CPU count to 4 and RAM to 8GB that way installation is as fast as possible. Then once its installed, it can be dropped down to 2 and 4 respectively. Continue past the VHD page and click finish. Double click the machine to start it.
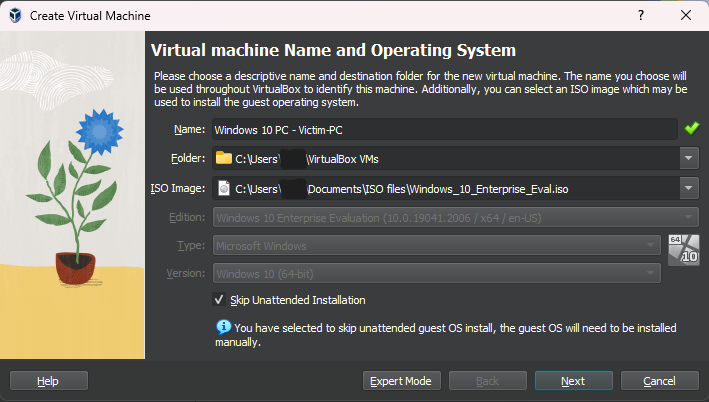 VirtualBox New Machine
During installation, I always choose Custom installation, and choose the drive to install on. During the setup, be sure to choose Domain join instead when asked to sign in with a Microsoft Account, as well as turning off all the telemetry toggles. The account setup will be for the local administrator account on the computer. You can set this to whatever you choose. I always keep track of my VM login info in the description of the machine in Virtualbox, so I don’t lose track of it. Once the machine is completely installed, check for updates and close the machine. I always check for updates, reboot, then check again. Windows likes to do all the updates in two laps rather than one. Once that is done, power the device down, modify the resources in VM settings, take a snapshot. Life is easiest if you always have a baseline snapshot to restore.
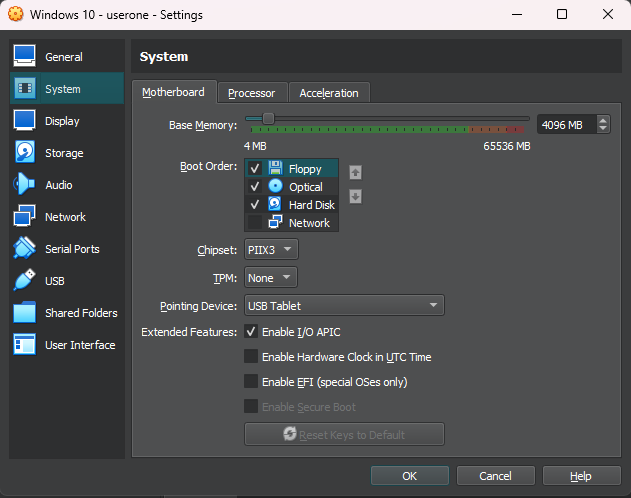 RAM
RAM
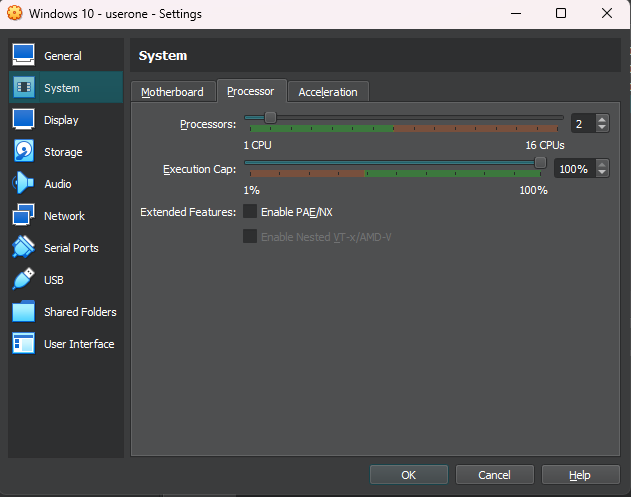 CPU
CPU
Kali Linux
This will be our attacker box. We will launch an attack against our domain controller from this machine. Kali makes it easy for us, providing a Virtualbox download already setup. Just download the pre-made vm for virtual box here, add it to Virtualbox via the green Add button, and fire it up. Sign in using kali kali and check for updates with sudo apt update and sudo apt upgrade in Terminal. Then close and make the initial snapshot.
Windows Server 2022
This will be our Active Directory Domain Controller. We will install the graphical version of Windows Server to make life easier. But down the road for other labs, I intend to incorporate some Powershell management to get experience with managing a DC via the command line. Download the ISO here and follow the same steps as the Windows 10 install to create the new virtual machine. Start it up, and when you get the Operating System Setup, choose Windows Server 2022 Standard Evaluation (Desktop Experience). Again choosing Custom installation and the drive we want to install it on.
Once installed, it will prompt for an administrator password. Write this down in the description. Then you will have to input Ctrl-Alt-Delete from the menu bar of the VM to unlock the machine. Once inside, follow the same steps as before, updating the machine, then powering down, setting the resources to 2 CPUs and 4GB of RAM, and snapshotting.
Ubuntu Server 22.04
This will be our Splunk server, but we will do all the Splunk configuration later. For now, lets just install Ubuntu. Download the ISO here and create a new machine. I set this machine to have an 100GB HDD instead of 25GB, just incase we want to store some extra data. I will also leave the specs a little higher, with 4 cores and 8GB of RAM once its installed, since it will be ingesting data and being queried. Click Done for all the options until you get to the Profile Setup screen. Write down these creds in the description in Virtualbox. Also check the box to install OpenSSH server, so we can SSH to the machine if we want. Continue on until it is installed and reboots.
Once rebooted, log in, and update the machine with sudo apt update && sudo apt upgrade. Once its done, shutdown with shutdown now and create your snapshot.
Final Steps
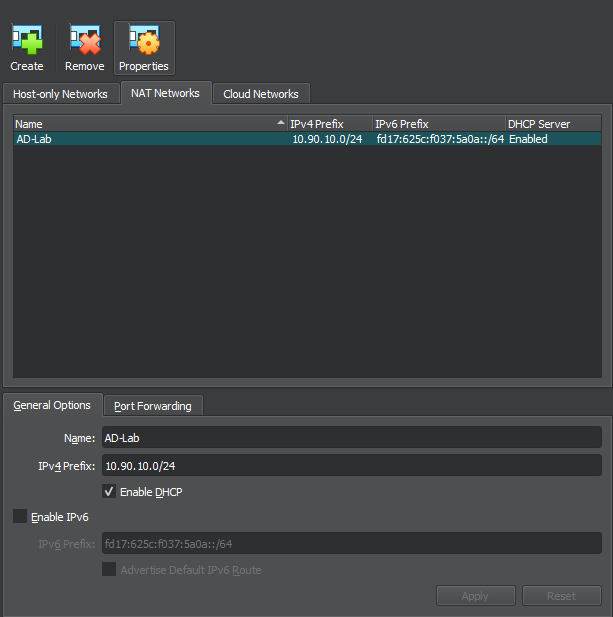
Now you have successfully installed the necessary machines for this lab. One final piece of setup before we dive in is the network. In Virtualbox, you can create virtual NAT networks for your VMs. In Tools, go to Network -> NAT Networks, and create a new NAT network, setting the IP configuration to the network you choose earlier, so I’m entering 10.90.10.0/24 and leaving DHCP on. Then set all the devices to NAT Network and choose the one you created.
 VirtualBox NAT Network
Splunk Setup
Splunk is one of the most well known SIEMs in the industry. We will only be touching the surface of its capabilities in this lab, but you can read about all its features on their website here. Luckily for us, they offer a free trial with limited data ingestion. Let’s get to work!
Ubuntu Server
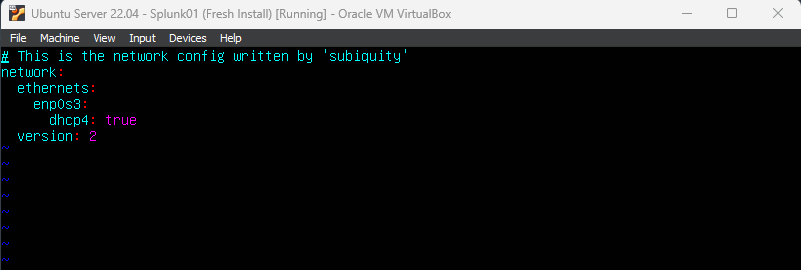
First, we will configure our Ubuntu server with a static IP address, as laid out in our network diagram. To do so, enter sudo vim /etc/netplan/00-installer-config.yaml. You should see the pictured content below.
 Ubuntu netplan config default
If you don’t know vim commands, it’s time to go learn the basics here. Vim is available on almost every Linux distribution and you should know the basics in case you ever need to use it in a pinch. We will be setting a static IP, along with the DNS server to use, and the default route. Your new configuration should look like this:
1
2
3
4
5
6
7
8
9
10
11
network:
	ethernets:
		enp0s3:
			dhcp4: no
			addresses: [10.90.10.10/24]
			nameservers:
				addresses: [8.8.8.8]
			routes:
				- to: default
					via: 10.90.10.1
version: 2
To recap, we set the static IP address to the one previously chosen for our Splunk server (10.90.10.10), we set the DNS to Google’s DNS server (8.8.8.8), and the default route to our gateway (10.90.10.1). Save and exit Vim then enter sudo netplan apply to apply the new configuration. You may get an error stating WARNING:root:Cannot call OPen vSwitch: bla bla bla. If you do, enter ip a to make sure the new configuration was applied, then ping 8.8.8.8 to make sure you have connectivity. If you don’t, recheck your netplan config and start googling.
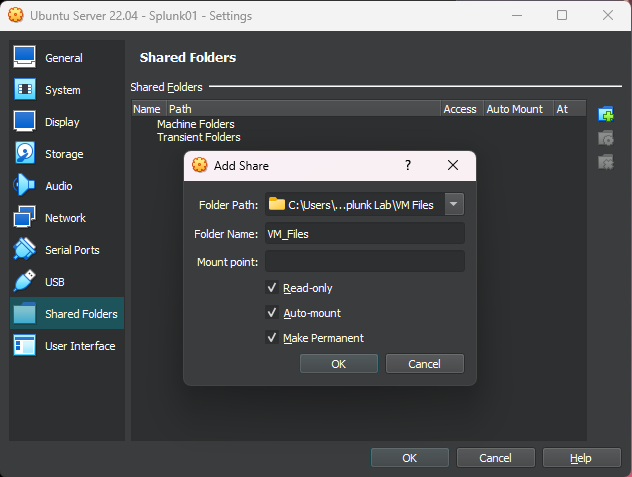
Next we want to install Virtualbox Guest Additions. To do so, enter sudo apt install virtualbox-guest-additions-iso. This will install Guest Additions, which adds some sweet features to our VM. Next, enter sudo apt install virtualbox-guest-utils and let that install. Once installed, click on Devices in the Virtualbox menu at the top, go to Shared Folders and Shared Folder Settings. Click the little green + icon on the right, and add a folder from our host that is shared with our guest VMs. I created a folder called VM Files, so I’ll choose that folder, leave the name of the folder alone, check all three boxes, and click Ok.
 Add shared folder in VirtualBox
Now, go to Splunk.com and create a free account. Then go to Products -> Free Trials and Downloads, and download Splunk Enterprise trial for Ubuntu Linux (.deb). Save this to the shared folder we created for the guest VMs. Reboot your Ubuntu VM with sudo reboot and now we have to add our user to the vboxsf group that has been created. Enter sudo adduser jlab vboxsf with jlab being the username you choose for your Ubuntu user account.
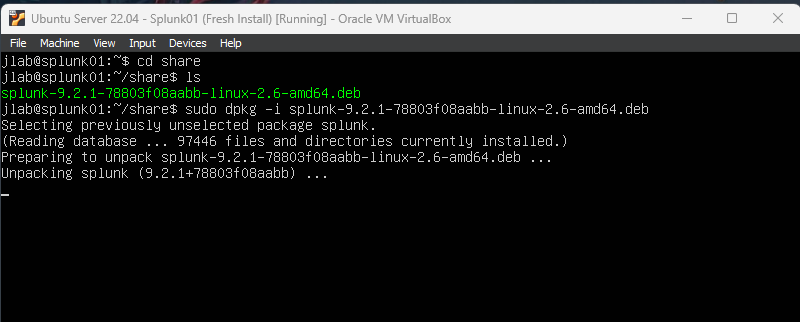
Now we will mount the shared folder. Create a new folder in the Ubuntu VM with mkdir share, then enter sudo mount -t vboxsf -o uid=1000,gid=1000 VM_Files share/ to mount the shared folder we created on our host to our VM. Now we can install Splunk. cd into your share folder then enter sudo dpkg -i <splunk_package_name> and let it install.
 Terminal Commands
Once completed, splunk will be installed in /opt/splunk/. If you check file permissions on the files in that folder, you will see they are all owned by the user splunk. We can change to that user with sudo -u splunk bash. As the splunk user, enter /bin and run ./splunk start to run the Splunk installer. Breeze through the T&Cs as you please, then hit y to accept. Now we will create a user account for splunk. I choose the same username and password as my Ubuntu VM.
To make sure Splunk starts on boot, we will exit the splunk user with exit, enter the opt/splunk/bin/ folder, and enter sudo ./splunk enable boot-start -user splunk. Now, whenever the machine reboots, Splunk will start running as the splunk user. Splunk is now up and running.
At this point, take another snapshot. It never hurts to have a couple as you progress. I always detail the description of the snapshot with the changes that have been made, so when I go back, I know exactly what has changed from the previous snapshot. Next we will install the Splunk Universal Forwarder on both our windows 10 PC and our Windows Server.
Windows 10 PC
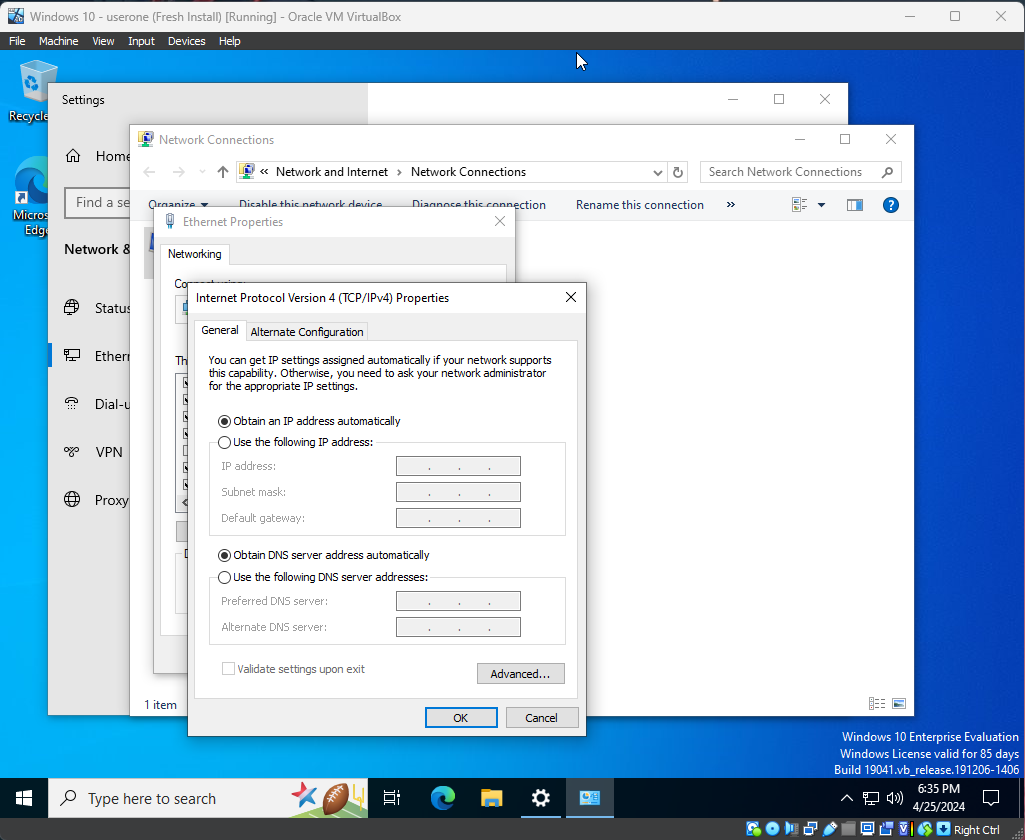
First, we will rename our PC to Victim-PC. You can do that by going to Settings -> About -> Rename this PC, entering the name, then rebooting. We also want to set a static IP so it doesn’t conflict with our servers. Lets set it to 10.90.10.50. Do that by right-clicking on the network icon in the Taskbar -> Network and Internet Settings -> Ethernet -> Change adapter options -> right-click the network adapter -> Properties -> double-click TCP/IPv4 -> and set the IP address, subnet, gateway, and DNS to 10.90.10.50, 255.255.255.0, 10.90.10.1, and 8.8.8.8 respectively.
 Set IP Address
Now, we can access the Splunk Web portal at 10.90.10.10:8000 since Splunk is listening on port 8000. Next, we will download and install the Splunk Universal Forwarder. Log into splunk.com with your Splunk account on the Windows 10 PC and go to Free Trials and Downloads and download the Universal Forwarder for Windows 10 64x .msi. Run the installer, check the box to accept the License and make sure the on-premises box is checked, then click next. Enter an administrator username, then let it generate a password and click next. Click next on the deployment server option, enter our Splunk server IP address and port 9997 on the Receiving Indexer window, then Next and Install.
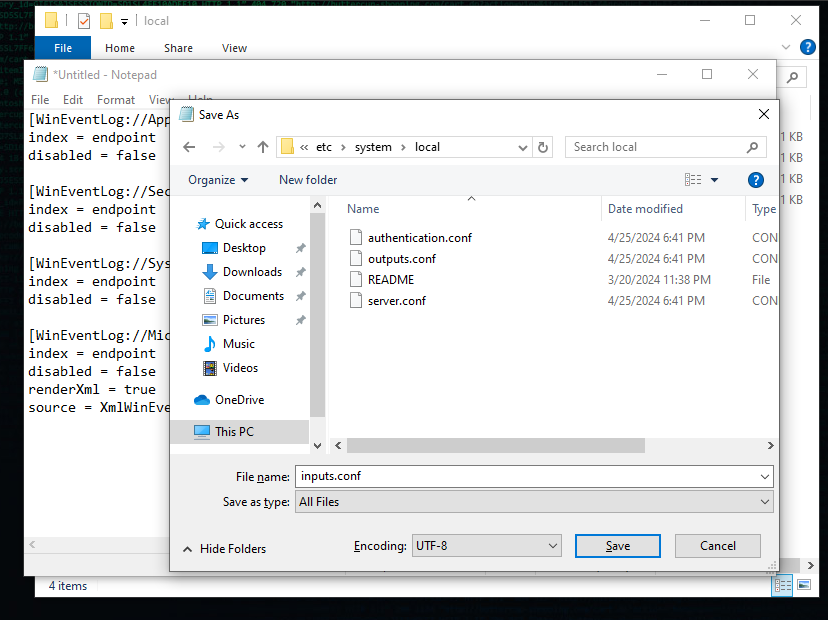
Now we need to configure Splunk with a .conf file. The file we will create is located at C:\Program Files\SplunkUniversalForwarder\etc\system\default\inputs.conf; however, this is the default file that should not be modified. Instead, we will create a new one in C:\Program Files\SplunkUniversalForwarder\etc\system\local. Since this is a protected folder, we will need to open Notepad.exe as an administrator, enter the configuration text below, then save it in that directory as inputs.conf, selecting All Files for the save as type so it doesn’t append .txt to the end of our file.
1
2
3
4
5
6
7
8
9
10
11
12
13
14
15
16
17
[WinEventLog://Application]
index = endpoint
disabled = false

[WinEventLog://Security]
index = endpoint
disabled = false

[WinEventLog://System]
index = endpoint
disabled = false

[WinEventLog://Microsoft-Windows-Sysmon/Operational]
index = endpoint
disabled = false
renderXml = true
source = XmlWinEventLog:Microsoft-Windows-Sysmon/Operational
 inputs.conf editing
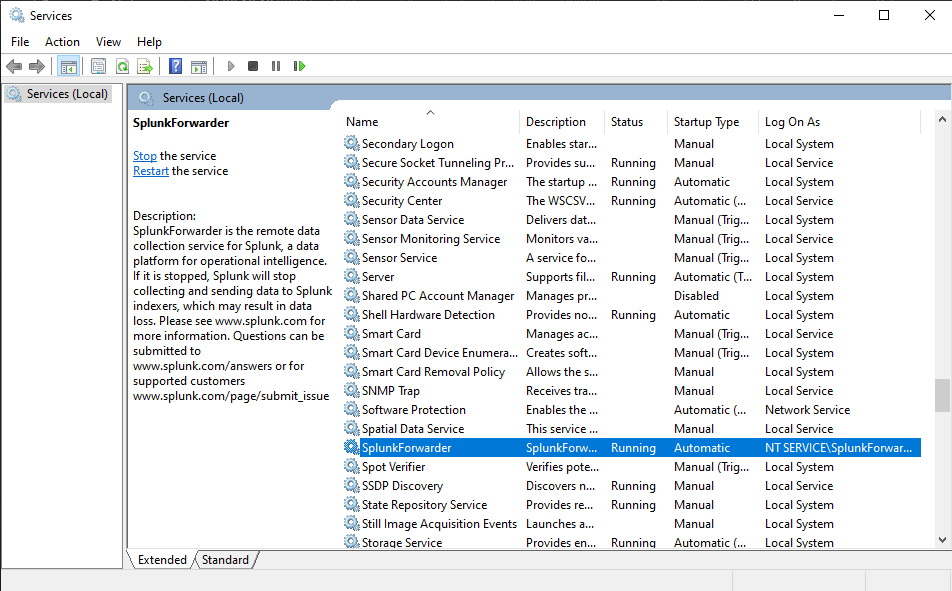
Whenever you edit the inputs.conf file, you must restart the Splunk Universal Forwarder. You can do that by running services.msc as administrator, finding the SplunkForwarder and restarting the service.
 Splunk Service
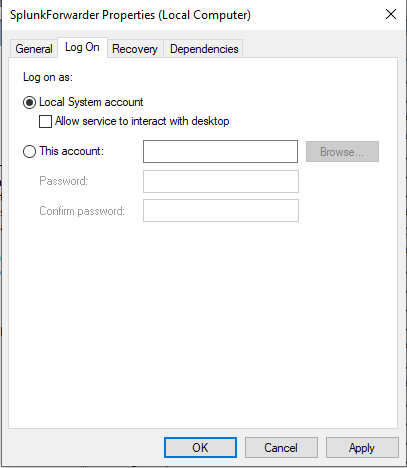
Before we restart, we will want to change the Log On As to Local Administrator to prevent issues with permissions when collection logs. To do that, double click the service, go to the Log on tab, and select the Local System account, apply the changes, then restart the service. You may get an error, just start the service after acknowledging the error.
 Set Local System account
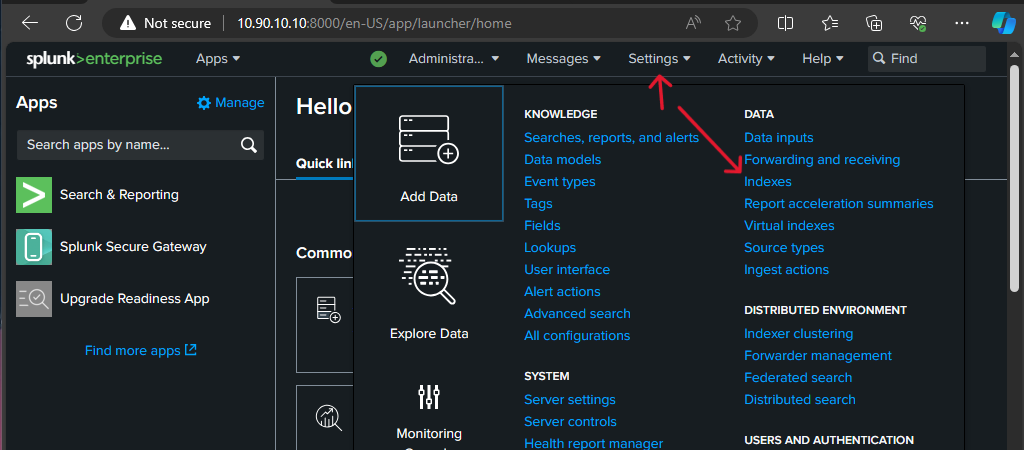
Now we can start configuring the Splunk server from the web portal at 10.90.10.10:8000. Login using the UN/PW you created in the Splunk setup. In the inputs.conf file, the index is set to endpoint for each entry. This is the index that Splunk will put the logs collected. We need to create that index on the Splunk server. Go to Settings -> Indexes and add a new index named endpoint.
 Splunk Index Menu
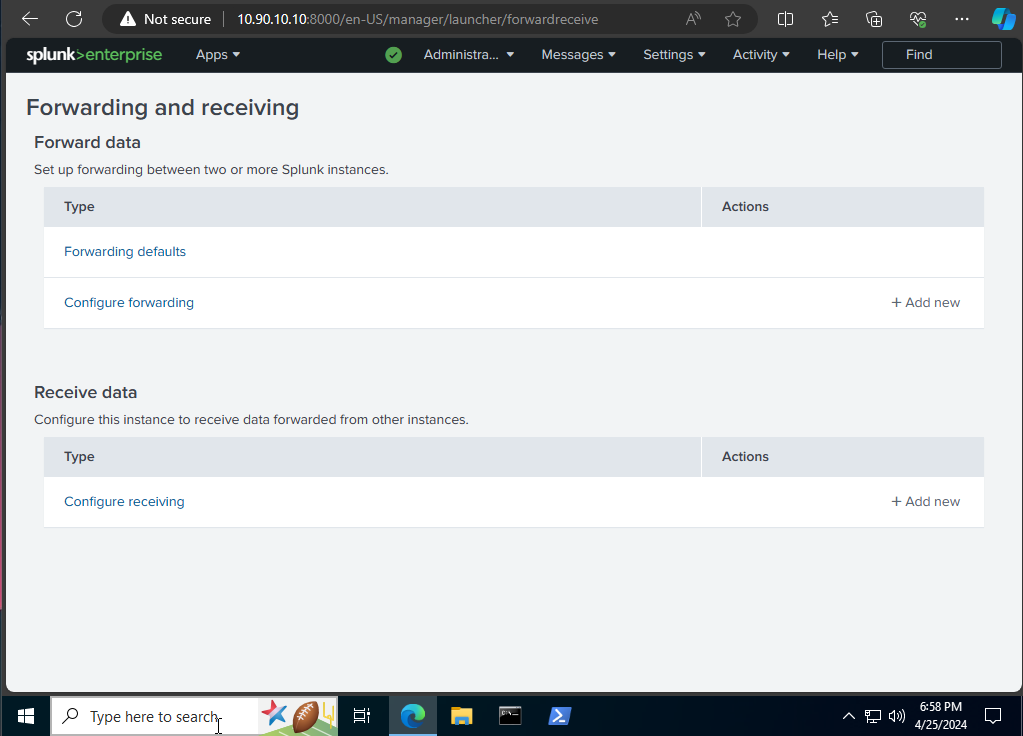
Now we will configure it to receive data, under Settings -> Forwarding and receiving and add a new receiving port. We will add port 9997 as that is the port we set when installing the Forwarder.
 Splunk Forwarding Menu
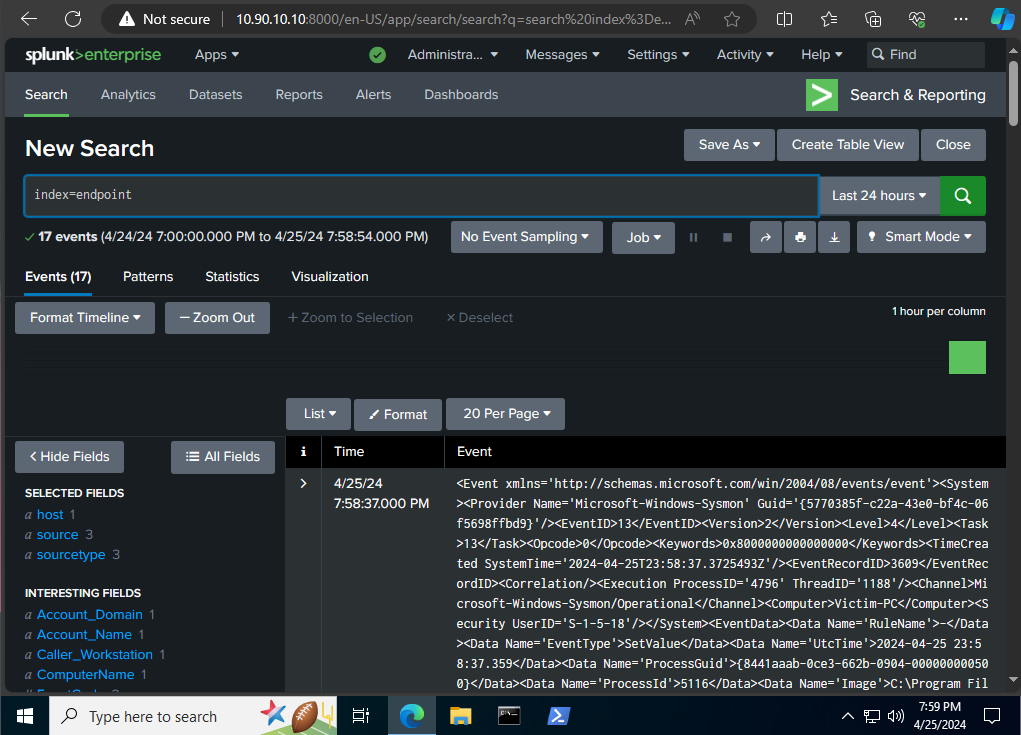
Now our Splunk server will being receiving logs. you can view them under Apps -> Search & Reporting. Enter index=endpoint in the search bar and click the search icon.
 Splunk Search
You can see Splunk lists the amount of events found right below the search box, as well as fields along the left side. If you click on host or source you will see Victim-PC and the three categories of events its collecting from Windows respectively. We won’t go through all that right now, first we want to setup our Windows Server with the Splunk forwarder.
Windows Server
Here we will will rename our server to DC01 following the same steps in the Windows 10 PC section. Once rebooted, we will set the static IP we choose in the Network Diagram and install Splunk Universal Forwarder. The steps are exactly the same as the steps on the Victim-PC.
You should now have Splunk configured on both Victim-PC and DC01. Feel free to familiarize yourself with the Splunk web interface, and check out some of the logs. We will dive into finding specific logs when we introduce Kali to the mix.
Configuring ADDS
Active Directory Domain Services are the features of Windows server that configure and manage user/computer accounts, forest, and domains.
Installing Active Directory Domain Services
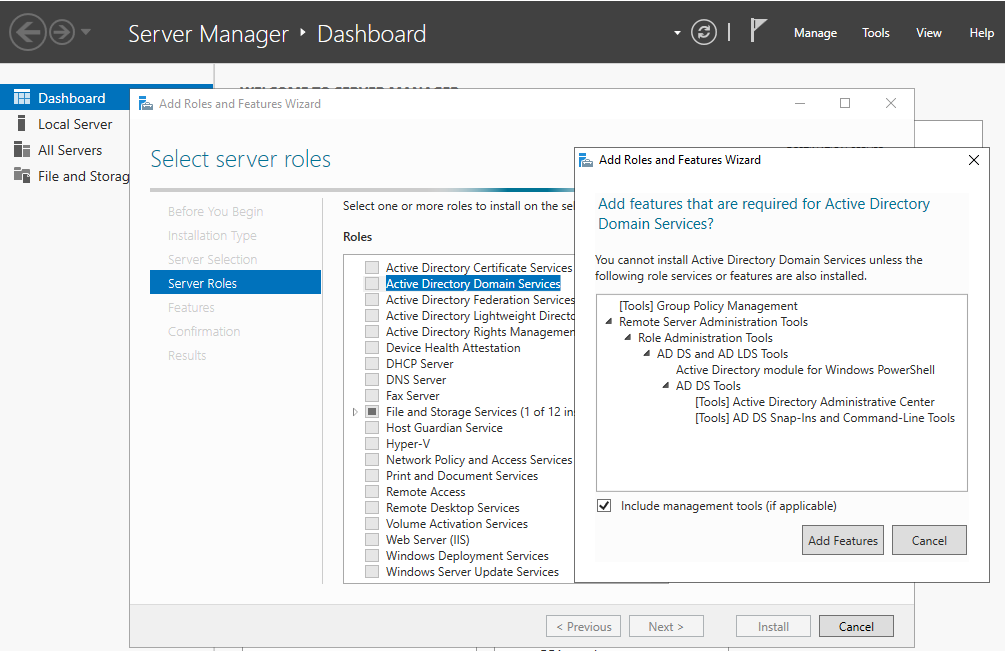
If you remember, we already configured the hostname and IP address of DC01 in the previous steps. This is crucial, because once we promote it to Domain Controller, we cannot change the hostname. So lets open the Server Manager and click on Manage in the top right, then Add Roles and Features. Click Next until you get to Server Roles, and choose Active Directory Domain Services. Click next several times then Install.
 Installing ADDS
Once it is installed, close the window and click on the flag at the top, selecting Promote to Domain Controller. In the new window, select Add a new forest, because we must create the forest for our domain. Enter your root domain name, which must be a top-level domain. I chose jlab.lcl; you can choose .local, however, I avoid doing so because in environments with Macs because it creates conflicts as the Bonjour mDNS uses the .local suffix. Click next, and set the Directory Services Restore Mode (DSRM) password. Be sure to write all this down in your description of the VM. Click Next until you can install, then install and let the server reboot.
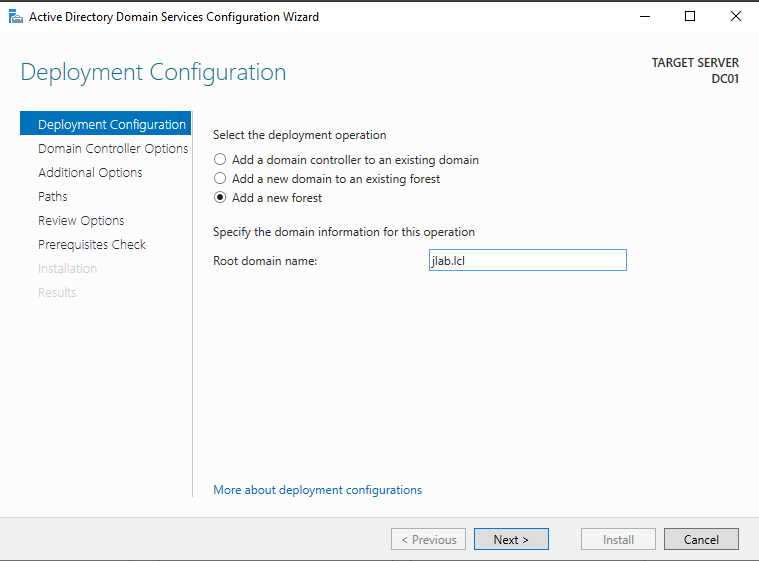 Deployment configuration
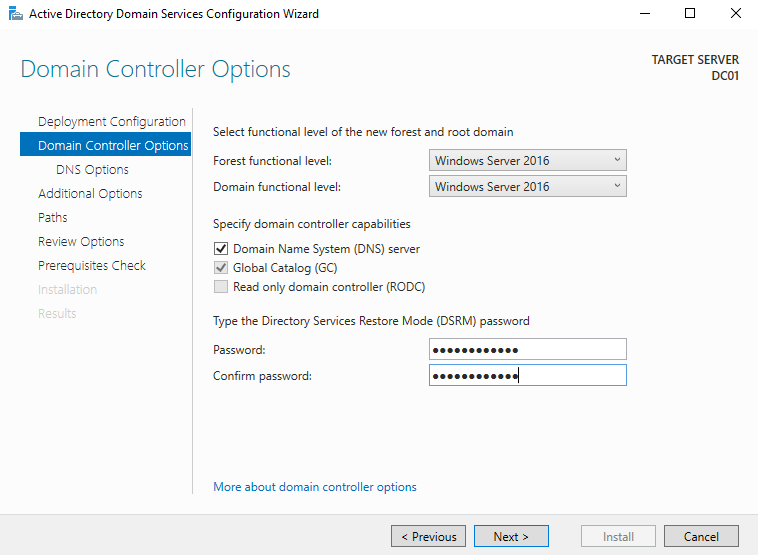 DSRM Password
Once rebooted, shut down and create a snapshot. It’s helpful to have a snapshot with ADDS installed, before we add users so if we screw up, we can always jump back to this save point.
Now if we wanted to make life super easy for ourselves later, we could remove all the password complexity requirements in AD. By default, there are restictions to have at least 8 characters, and at least one letter and one number. You can view these policies in Server Manager, go to Tools, and open Group Policy Management. In the new window, expand Forest -> Domains -> jlab.lcl -> and right-click Default Domain Policy and click Edit. Now expand Policies -> Windows Settings -> Security Settings -> Account Policies -> and click Password Policy. We could change three policies, Maximum password age, Minimum password length and Password must meet complexity requirements. However, we have bigger, better plans for later that include some python scripting.
Creating Users and OUs
Active Directory works as a database of domains, users, and computers. You can read more about it here. We will be following best practices by creating our own Organizational Units (OUs) and Security Groups for our environment.
I will be using a custom script to import an assortment of users. You can find the script and CSV file of users on my github [here]. Download both the import_users.ps1 and ad_users.csv files to DC01. In order to run the PS1 script, you will have to set the Powershell execution policy to Unrestricted with this command Set-ExecutionPolicy Unrestricted.
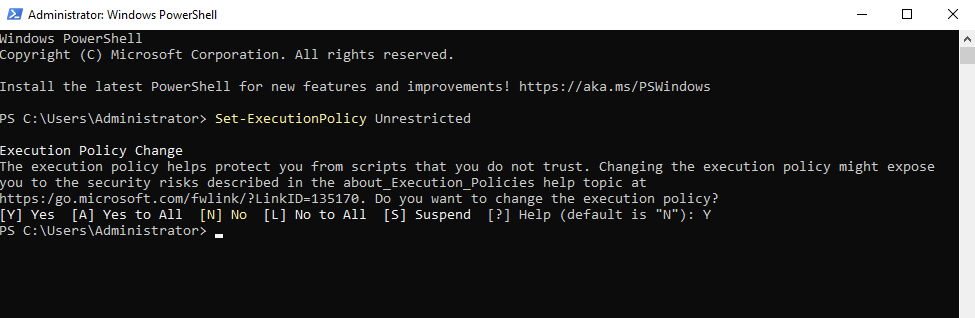 Set Execution Policy
Then you can change into the Downloads directory and run .\import_users.ps1. Click on Tools > Active Directory Users and Computers (ADUC) in Server Manager to view the newly created OUs, security groups, and users. It should look like the picture below.
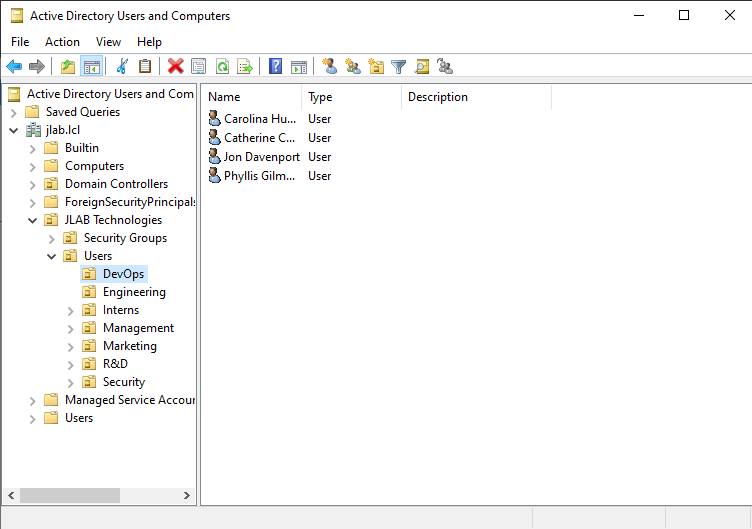 ADUC
ADUC
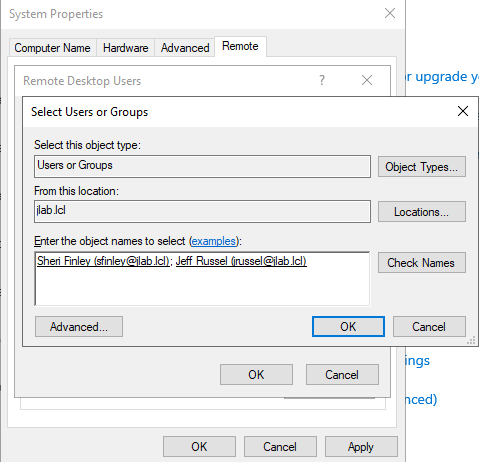
Once you have verified the script ran correctly, reset the Powershell execution policy to RemoteSigned. In order to allow RDP to the domain controller from certain users, we must add them to the Administrators default Security Group. Lets add Sheri Finley (CEO) and Jeff Russel (Security Officer). Do so in ADUC by double-clicking the user’s account, going to Member of, and adding the Administrators default Security Group to their account.
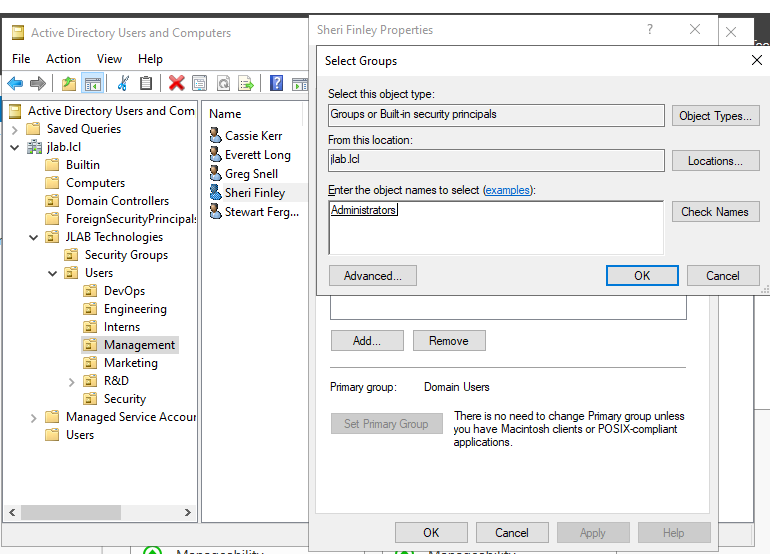 Adding Administrators group
Now that Active Directory is fully setup, we will join Victim-PC to the domain. On Victim-PC, go to Control Panel -> Network and Sharing Center -> Change Adapter settings -> right-click the Ethernet adapter and click Properties -> double-click Internet Protocol Version 4 (TCP/IPv4) entry and set the DNS to 10.90.10.5 so that it looks to DC01 for DNS. This is required to join the computer to the domain. Apply/save/accept all of that and close all those windows. Now go to Settings -> About -> Advanced System Settings -> under Computer name click on Network ID and follow the steps to add the computer to the domain. You will need your administrator account to the domain, and the domain name. [Because sfinley and jrussel are administrators, they could add the computer. they are essentially domain admins]. At the end, don’t add the administrator account as a domain user account. Restart the computer.
 Join Victim-PC to domain
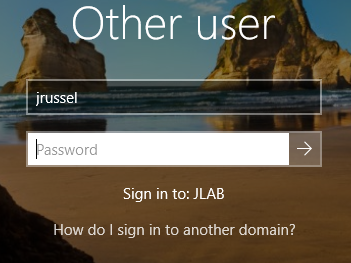
Once rebooted, we can login with one of our AD user accounts we created. On the login screen, click Other User. You’ll notice its now prompting you to Sign in to: JLAB. This mean it wants an Active Directory account. If we wanted to sign in to the local administrator account, we would have to enter Victim-PC\<local user account> or .\<local user account> which is the same as the previous line, and you will see the Sign in to: changes to VICTIM-PC instead of JLAB.
 Sign in to domain account
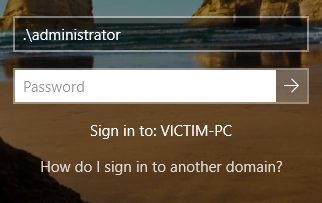 Sign in to local account
Anyways, lets sign in with jrussel and his password from the ad_users.csv. It will create the user profile on first sign in.
Now power down both Victim-PC and DC01 and create a snapshot of both. Since adding Victim-PC to the domain makes changes on the domain controller, we want to snapshot both to make sure we can come back to a consistent point.
Making Some Noise
It’s finally time to do some hacking! We will attempt to bruteforce an AD account via RDP, then review the logs in Splunk to see how we can detect such an attack.
Kali Linux Setup
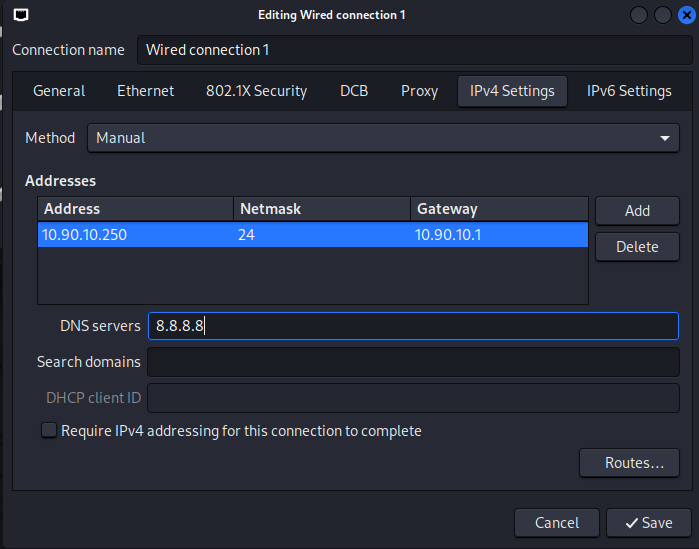
As before, we will set a static IP for our kali machine. Do so by right-clicking the ethernet icon at the top, clicking Edit connections, modifying the Wired connection 1, and adding our address in the IPv4 Settings section. Don’t forget to add the address, subnet mask (in CIDR form), Gateway, and then 8.8.8.8 for the DNS server. Now click Save, then close that window, click the ethernet icon again, then disconnect and reconnect to reflect the changes. You can open Terminal and type ifconfig or ip a to see your current IPv4 settings.
 Set Kali IP
Now we are going to do a brute-force attack against DC01 to see what kind of logs are generated and collected by our SIEM. On DC01, go to Settings -> System -> About -> Advanced System Settings. In that window, go to the Remote tab and select Allow remote connections to this computer. Then click the Select Users… button and add some users from our imported list who would probably have RDP access to the DC. I’m going to choose the Security Office Jeff Russel, and our CEO Sheri Finley since its best practice to have two users with access, incase a “got hit by a bus” scenario occurs. Then click Apply, Ok, and Ok again.
 Add users to RDP
Launching an attack
Back in Kali, we are going to use Hydra to brute force Sheri Finley’s password. We are going to use the password list that comes default with all Kali installations; its stored in /usr/share/wordlists/rockyou.txt. You might have to decompress it if it has .gz appended to the end of it. Use sudo gzip -d .\rockyou.txt.gz. Now that we have our wordlist, we want to be smart. This is a default AD configuration, so that means there are password complexity rules. If we just fire up Hydra using this wordlist it could take forever. For this case, I wrote a simple python script to strip out the first 500 passwords from rockyou.txt that meet AD’s password complexity rules. Don’t ask me how I got the regex in the script. Download pw_list_cleaner.py from my github to your Kali machine’s desktop.
In order to run the script, we need to first set the execute bit on it. Open terminal, navigate to the Desktop, and enter chmod +x pw_list_cleaner.py. This will allow us to run the script. Next, copy the rockyou.txt file to the desktop with cp /usr/share/wordlists/rockyou.txt ~/Desktop. Then enter ./pw_list_cleaner.py to run the script. The script will output 500 passwords for you. I could have wrote the script to automatically post them into a text file on the desktop, but I’ll let you figure that bit out. If you don’t go that route, just copy the scripts output into a new file, and save it as passwords.txt on the desktop.
Hint: use redirection in the terminal to copy the passwords to a file
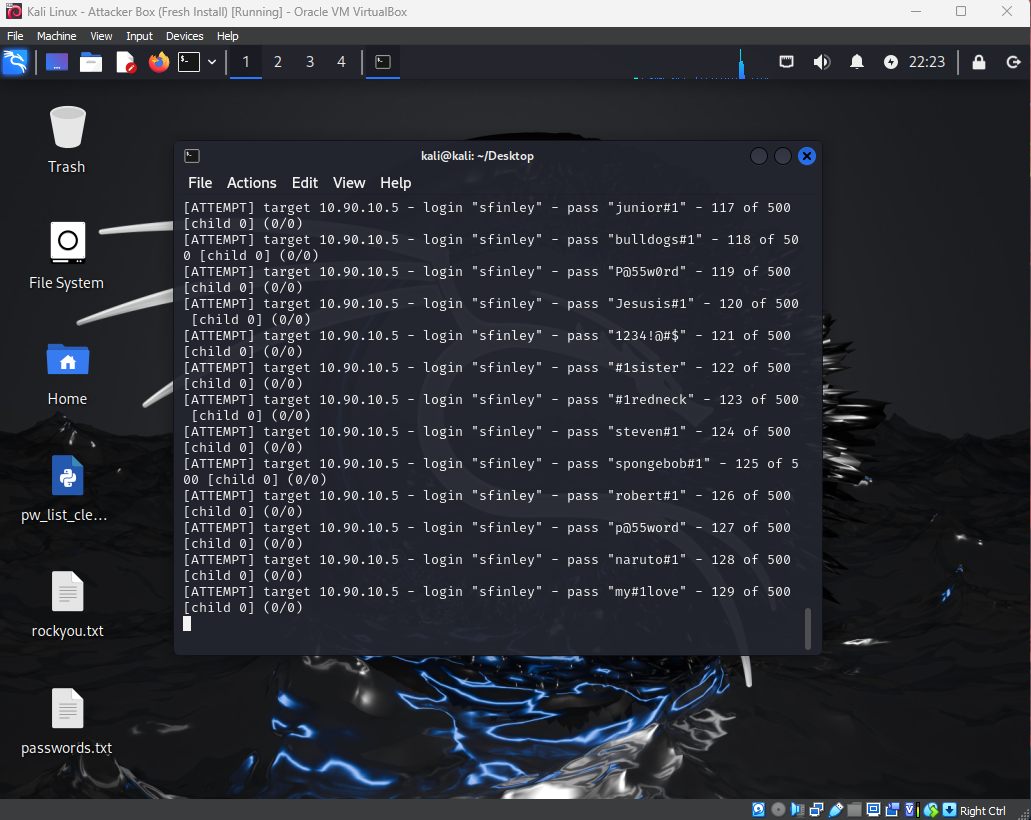
Now, back in terminal, we are going to use Hydra to bruteforce RDP with Sheri Finley’s username. Enter hydra -t 1 -V -f -l sfinley -P passwords.txt rdp://10.90.10.5 and let it run. Below is an explanation of the command and what the output should look like.
Command Explanation: hydra - name of program we are invoking -t 1 - number of threads to run on -V - verbose mode -l sfinley - user account name we are bruteforcing -P passwords.txt - password list to use rdp://10.90.10.5 - our target
 Hydra command
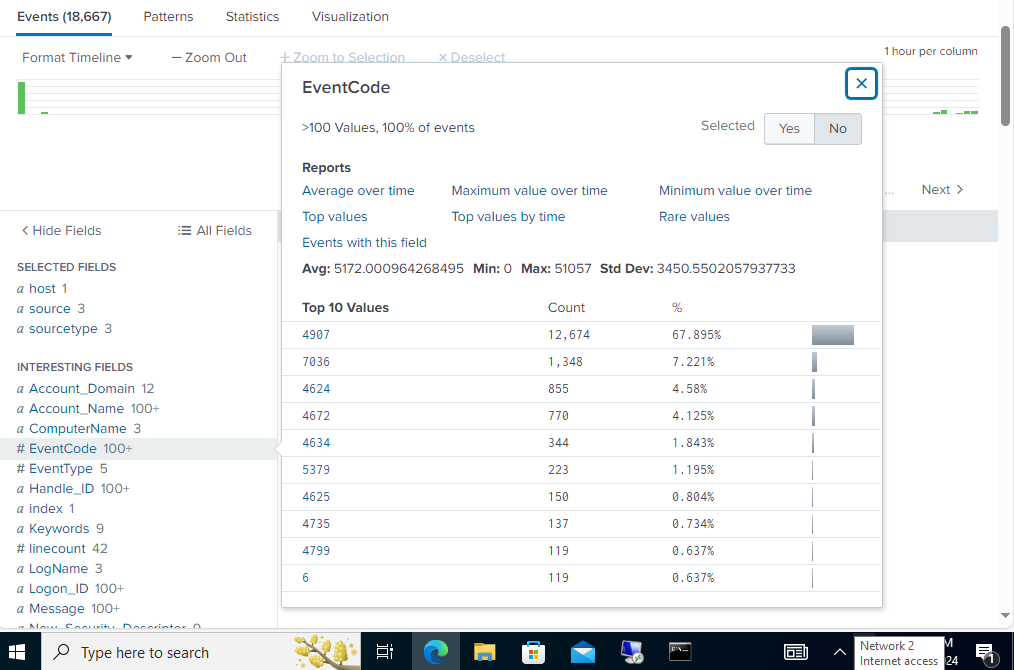
Look at that! We got a hit in only 143 attempts! Lets go check our Splunk server! Switch the time range to All Time and search for index=enpoint host=DC01. Then scroll down to the Event Code in Interesting Fields and select event code 4625, which means Failed logon. You see we have 150 events within the last hour.
 Event Code 4625
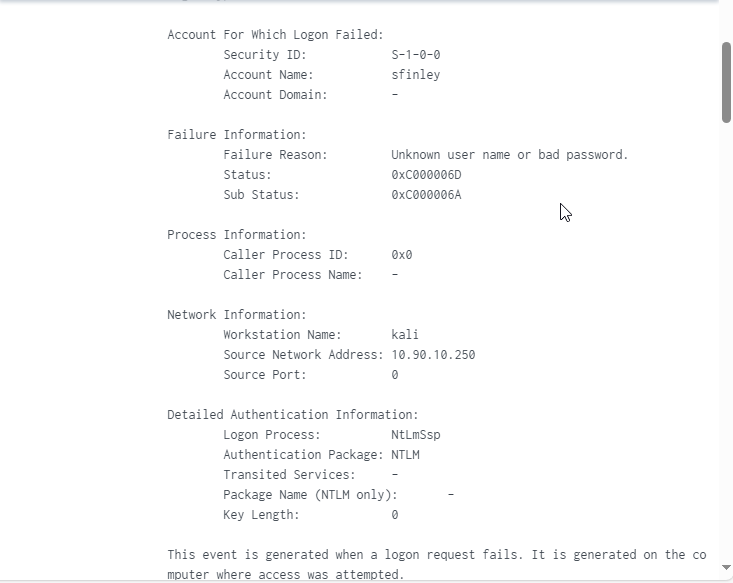
Clicking Show all # lines will give you details on the log. You can see that it identifies the user involved, and the attacking machine, kali. And if you click Patterns next to the event count, you see it identified a pattern of event code 4625 with the user account sfinley. 4624 is a user login success, we will want to search the logs to see if there are any with that event code for sfinley as that would indicate the attacker was successful.
 Log details
You have identified a basic bruteforce attack via Splunk! I urge you to continue testing in this environment; create some alerts for Splunk to automatically recognize attacks like this, try some other attacks, break and rebuild AD as needed.
All of this practical application will solidate the information and give you real-world experience for your career. There are so many more things you can do, this is simply opening the door to dive in.